| ci | ||
| images | ||
| native | ||
| other/EspansoNotifyHelper | ||
| packager | ||
| src | ||
| .gitignore | ||
| azure-pipelines.yml | ||
| build.rs | ||
| Cargo.lock | ||
| Cargo.toml | ||
| LICENSE | ||
| packager.py | ||
| README.md | ||
A cross-platform Text Expander written in Rust
What is a Text Expander?
A text expander is a program that detects when you type a specific keyword and replaces it with something else. This is useful in many ways:
- Save a lot of typing, expanding common sentences.
- Create system-wide code snippets.
- Execute custom scripts
- Use emojis like a pro.
Key Features
- Works on Windows, macOS and Linux
- Works with almost any program
- Works with Emojis 😄
- Date expansion support
- Custom scripts support
- Shell commands support
- App-specific configurations
- File based configuration
Table of contents
Installation
Windows
The installation on Windows is pretty straightforward, navigate to the
Release page and
download the latest installer ( usually named like
espanso-win-0.1.0.exe ).
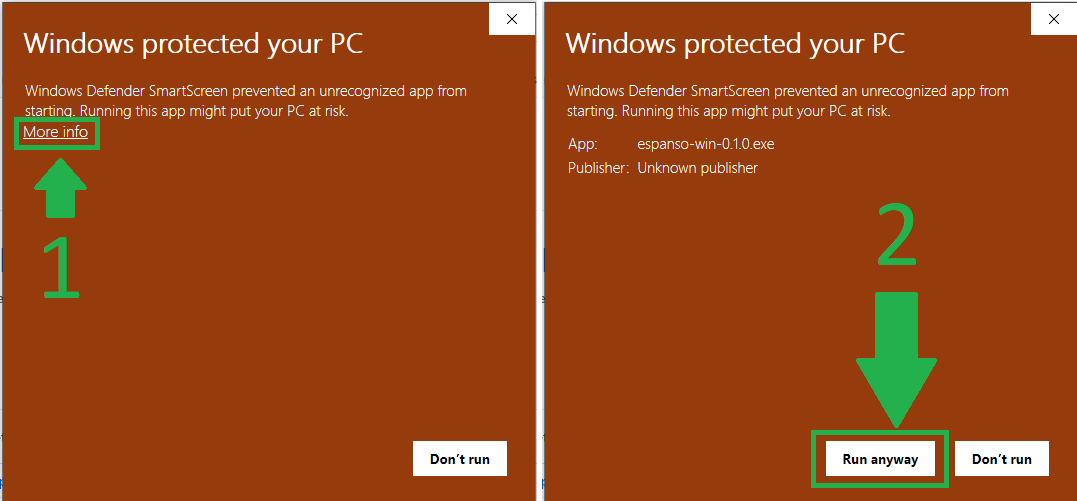
Because espanso is not digitally signed, you may experience a warning from Windows Smartscreen. In this case, just click on "More info" (1) and then on "Run anyway" (2), as shown in the picture:
If you completed the installation procedure, you should have espanso running.
A good way to find out is by going on any text field and typing :espanso.
You should see "Hi there!" appear.
Linux
TODO
MacOS
The easiest way to install espanso on macOS using the Homebrew package manager, but you can also do it manually.
Using Homebrew
The first thing to do is to add the official espanso tap to Homebrew with the following command:
brew tap federico-terzi/espanso
Then you can install espanso with:
brew install espanso
To make sure that espanso was correctly installed, you can open a terminal and type:
espanso --version
At this point, you have to Enable Accessibility to use espanso.
Enabling Accessibility
Because espanso uses the macOS Accessibility API to work, you need to authorize it using the following procedure:
Open a terminal and type the command:
espanso install
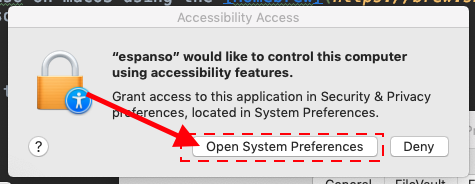
A dialog should show up, click on "Open System Preferences", as shown here:
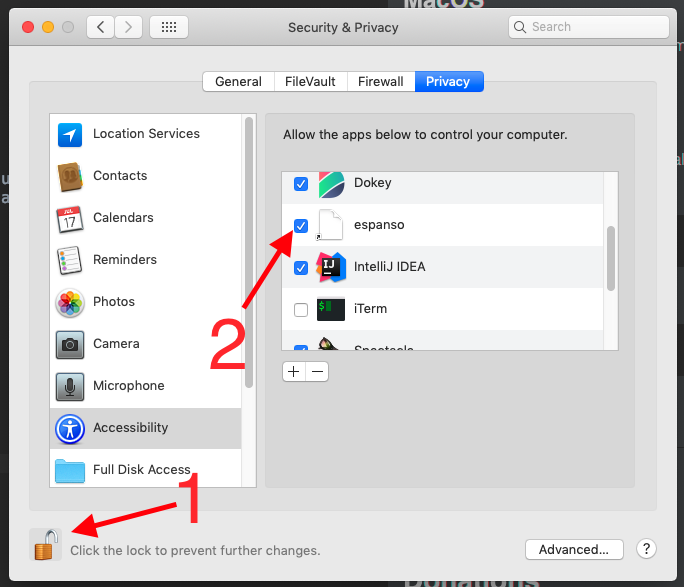
Then, in the "Privacy" panel click on the Lock icon (1) to enable edits and then check "espanso" (2), as shown in the picture:
Now open the terminal again and type:
espanso install
If everything goes well, you should see the espanso icon appear in the status bar:
If you now type :espanso in any text field, you should see "Hi there!" appear!
Usage
TODO
FAQ
How does espanso work?
TODO
Donations
espanso is a free, open source software developed in my (little) spare time. If you liked the project and would like to support further development, please consider making a small donation, it really helps :)
License
espanso was created by Federico Terzi and is licensed under the GPL-3.0 license.


